Hadoop - How to setup a Hadoop Cluster
Below is a step-by-step guide which I had used to setup a Hadoop Cluster
3 VMs involved:
1) NameNode, ResourceManager - Host name: NameNode.net
2) DataNode 1 - Host name: DataNode1.net
3) DataNode 2 - Host name: DataNode2.net
1) You could create a new Hadoop user or use an existing user. But make sure the user have access to the Hadoop installation in ALL nodes
2) Install JAVA. Refer here for a good version. In this guide, Java is installed at /usr/java/latest
3) Download a stable version of Hadoop from Apache Mirrors
This guide is based on Hadoop 2.7.1 and assume that we had create a user call hadoop
1) Run the command
This command will ask you a set of questions and accepting the default is fine. Eventually, it will create a set of private key (id_rsa) and public key (id_rsa.pub) at the user directory (/home/hadoop/.ssh)
2) Copy the public key to all Nodes with the following
3) Test the passphaseless SSH connection from NameNode with
1) With the downloaded Hadoop distribution. Unzip it to a location where the Hadoop user had access
For this guide, I had create a /usr/local/hadoop and un-tar the distribution at this folder. The full path of Hadoop installation is /usr/local/hadoop/hadoop-2.7.1
1) It is best that Hadoop Variables are exported to the environment when user log in. To do so, run the command at the NameNode
2) Add the following in /etc/profile.d/hadoop.sh
Scenario
3 VMs involved:
1) NameNode, ResourceManager - Host name: NameNode.net
2) DataNode 1 - Host name: DataNode1.net
3) DataNode 2 - Host name: DataNode2.net
Pre-requisite
1) You could create a new Hadoop user or use an existing user. But make sure the user have access to the Hadoop installation in ALL nodes
2) Install JAVA. Refer here for a good version. In this guide, Java is installed at /usr/java/latest
3) Download a stable version of Hadoop from Apache Mirrors
This guide is based on Hadoop 2.7.1 and assume that we had create a user call hadoop
Setup Passphaseless SSH from NameNode to all Nodes.
1) Run the command
ssh-keygen
This command will ask you a set of questions and accepting the default is fine. Eventually, it will create a set of private key (id_rsa) and public key (id_rsa.pub) at the user directory (/home/hadoop/.ssh)
2) Copy the public key to all Nodes with the following
ssh-copy-id -i /home/hadoop/.ssh/id_rsa.pub NameNode.net
ssh-copy-id -i /home/hadoop/.ssh/id_rsa.pub DataNode1.net
ssh-copy-id -i /home/hadoop/.ssh/id_rsa.pub DataNode2.net
3) Test the passphaseless SSH connection from NameNode with
ssh (hostname)
Install Hadoop in all Node
1) With the downloaded Hadoop distribution. Unzip it to a location where the Hadoop user had access
For this guide, I had create a /usr/local/hadoop and un-tar the distribution at this folder. The full path of Hadoop installation is /usr/local/hadoop/hadoop-2.7.1
Setup Environment Variables
1) It is best that Hadoop Variables are exported to the environment when user log in. To do so, run the command at the NameNode
sudo vi /etc/profile.d/hadoop.sh
2) Add the following in /etc/profile.d/hadoop.sh
export JAVA_HOME=/usr/java/latest
export HADOOP_HOME=/usr/hadoop
export HADOOP_COMMON_HOME=$HADOOP_HOME
export HADOOP_HDFS_HOME=$HADOOP_HOME
export HADOOP_MAPRED_HOME=$HADOOP_HOME
export HADOOP_YARN_HOME=$HADOOP_HOME
export HADOOP_OPTS="-Djava.library.path=$HADOOP_HOME/lib/native"
export HADOOP_COMMON_LIB_NATIVE_DIR=$HADOOP_HOME/lib/native
export PATH=$HADOOP_HOME/sbin:$HADOOP_HOME/bin:$JAVA_HOME/bin:$PATH
3) Source this file or re-login to setup the environment.
4) (OPTIONAL) Set up the above for all Nodes.
1) Make a directory to hold NameNode data
2) Setup $HADOOP_HOME/etc/hadoop/hdfs-site.xml

Note: dfs.datanode.data.dir value must be a URI
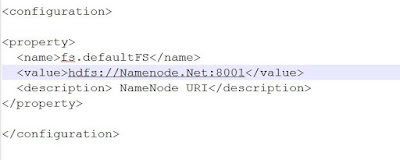
3) Setup $HADOOP_HOME/etc/hadoop/core-site.xml

4) (OPTIONAL) Setup $HADOOP_HOME/etc/hadoop/mapred-site.xml (We are using NameNode as ResourceManager)

5) (OPTIONAL) Setup $HADOOP_HOME/etc/hadoop/yarn-site.xml (We are using NameNode as ResourceManager)
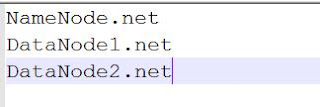
6) Setup $HADOOP_HOME/etc/hadoop/slaves
First, remove localhost from the file, then add the following

1) Make a directory to hold DataNode data
2) Setup $HADOOP_HOME/etc/hadoop/hdfs-site.xml

Note: dfs.datanode.data.dir value must be a URI
3) Setup $HADOOP_HOME/etc/hadoop/core-site.xml

The above setting should be enough to set up the Hadoop cluster. Next, for the first time, you will need to format the NameNode. Use the following command to format the NameNode
Example output is

Note: the same command can be used to reformat your existing NameNode. But remember to clean up your datanodes hdfs folder as well.
You can start Hadoop with the given script
Example output is
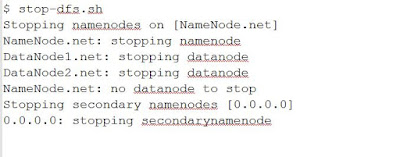
You can stop Hadoop with the given script
Example output is

You can start the ResourceManager, in this case, Yarn, with the given script
Example output is

You can stop the ResourceManager, in this case, Yarn, with the given script
Example output is

You can use the following command to show status of Hadoop
Example output is
You can also do the following to perform a complete test to ensure Hadoop is running fine.
You could access the Hadoop Resource Manager information at http://NameNode_hostname:8088

You could also access the Hadoop cluster summary at http://NameNode_hostname:50070. You should be able to see the number of datanodes being setup for the cluster.

1. http://www.server-world.info/en/note?os=CentOS_7&p=hadoop
2. http://hadoop.apache.org/docs/current/hadoop-project-dist/hadoop-common/ClusterSetup.html
4) (OPTIONAL) Set up the above for all Nodes.
Setup NameNode & ResourceManager
1) Make a directory to hold NameNode data
mkdir /usr/local/hadoop/hdfs_namenode
2) Setup $HADOOP_HOME/etc/hadoop/hdfs-site.xml

3) Setup $HADOOP_HOME/etc/hadoop/core-site.xml

4) (OPTIONAL) Setup $HADOOP_HOME/etc/hadoop/mapred-site.xml (We are using NameNode as ResourceManager)

5) (OPTIONAL) Setup $HADOOP_HOME/etc/hadoop/yarn-site.xml (We are using NameNode as ResourceManager)
First, remove localhost from the file, then add the following

Setup DataNodes
1) Make a directory to hold DataNode data
mkdir /usr/local/hadoop/hdfs_datanode
2) Setup $HADOOP_HOME/etc/hadoop/hdfs-site.xml

Note: dfs.datanode.data.dir value must be a URI
3) Setup $HADOOP_HOME/etc/hadoop/core-site.xml

Format NameNode
The above setting should be enough to set up the Hadoop cluster. Next, for the first time, you will need to format the NameNode. Use the following command to format the NameNode
hdfs namenode -format
Example output is

Note: the same command can be used to reformat your existing NameNode. But remember to clean up your datanodes hdfs folder as well.
Start NameNode
You can start Hadoop with the given script
start-dfs.sh
Example output is
Stop NameNode
You can stop Hadoop with the given script
stop-dfs.sh
Example output is

Start ResourceManager
You can start the ResourceManager, in this case, Yarn, with the given script
start-yarn.sh
Example output is

Stop ResourceManager
You can stop the ResourceManager, in this case, Yarn, with the given script
stop-yarn.sh
Example output is

Show status of Hadoop
You can use the following command to show status of Hadoop
jps
Example output is
Complete Testing
You can also do the following to perform a complete test to ensure Hadoop is running fine.
You could access the Hadoop Resource Manager information at http://NameNode_hostname:8088

You could also access the Hadoop cluster summary at http://NameNode_hostname:50070. You should be able to see the number of datanodes being setup for the cluster.
Reference
1. http://www.server-world.info/en/note?os=CentOS_7&p=hadoop
2. http://hadoop.apache.org/docs/current/hadoop-project-dist/hadoop-common/ClusterSetup.html


Comments
Post a Comment