
VirtualBox - Reusing VDI Harddisk
There are a few techniques to reuse old VirtualBox setting in a new Windows/Mac/Linux machine.
1. Some posts says just copy the VirtualBox setting to a new machine. Adjust the UUID in the xml file so that the new VirtualBox. I never try it because it looks tedious and setting of UUID may not be trival. Also, what if there is a change of hardware such as change of machine?
2. In VirtualBox, they provide an option to Export an Appliance. Well, it does work for single standalone appliance. But, I have a shared vdi and 3 different OS VM using it. That causes an issue during my import because of my shared vdi.
3. My current way of doing. Copy the vdi and manually setup the VM environment. This way, although manual, but at least, the change in hardware and VM setting such as UUID is handled by VirtualBox
The following steps work for me when I reuse a Windows VirtualBox VDI harddisk file in Mac OS X VirtualBox
1. Download and install VirtualBox
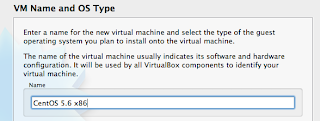
2. Create a new VM by clicking the New button. I named it as CentOS 5.6 x86
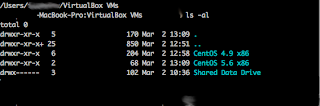
3. Following the wizard until it asks for Virtual Harddisk Setup. At this point of time, by default, VirtualBox has created a VM folder for your settings. Check "/Users/your_username/VirtualBox VMs" for Mac OS and "C:\Users\your_username\VirtualBox VMs" for Windows 7. So, in this example, I will have a folder created as "/Users/your_username/VirtualBox VMs/CentOS 5.6 x86"
4. For cleanliness/admin purpose, I like to put the vdi file together with the VM folder. So, I copy my old vdi files into the newly created VM folder "/Users/your_username/VirtualBox VMs/CentOS 5.6 x86". This is just my habit. Your vdi can be at any location.
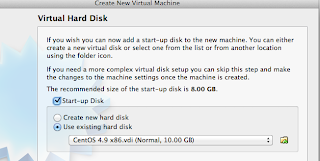
5. After copying, go back to the wizard. Now, click on "Use existing hard disk" and use the browse folder button to locate your old vdi file. If the vdi is added successfully, it will appear at the drop down menu as normal. Click continue and finish the wizard setup
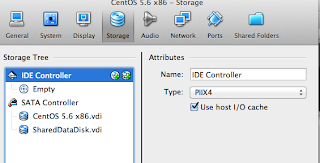
6. Although each OS has the ability to detect a change in hardware, it is better for you to maintain the same harddisk setup (IDE/SATA) as per your old VM setting. Select your new VM, go to Setting -> Storage and set up as per your old VM Storage setting.
7. Also, remember to setup your Network if necessary.
8. Now, select your new VM and click start to run it. Depend on your hardware changes, your OS will detect and ask your for hardware information if needed
That all. Although it requires manual setup of the VM, this way will create the VM xml, UUID and detect hardware changes safely.
1. Some posts says just copy the VirtualBox setting to a new machine. Adjust the UUID in the xml file so that the new VirtualBox. I never try it because it looks tedious and setting of UUID may not be trival. Also, what if there is a change of hardware such as change of machine?
2. In VirtualBox, they provide an option to Export an Appliance. Well, it does work for single standalone appliance. But, I have a shared vdi and 3 different OS VM using it. That causes an issue during my import because of my shared vdi.
3. My current way of doing. Copy the vdi and manually setup the VM environment. This way, although manual, but at least, the change in hardware and VM setting such as UUID is handled by VirtualBox
The following steps work for me when I reuse a Windows VirtualBox VDI harddisk file in Mac OS X VirtualBox
1. Download and install VirtualBox
2. Create a new VM by clicking the New button. I named it as CentOS 5.6 x86

3. Following the wizard until it asks for Virtual Harddisk Setup. At this point of time, by default, VirtualBox has created a VM folder for your settings. Check "/Users/your_username/VirtualBox VMs" for Mac OS and "C:\Users\your_username\VirtualBox VMs" for Windows 7. So, in this example, I will have a folder created as "/Users/your_username/VirtualBox VMs/CentOS 5.6 x86"

4. For cleanliness/admin purpose, I like to put the vdi file together with the VM folder. So, I copy my old vdi files into the newly created VM folder "/Users/your_username/VirtualBox VMs/CentOS 5.6 x86". This is just my habit. Your vdi can be at any location.
5. After copying, go back to the wizard. Now, click on "Use existing hard disk" and use the browse folder button to locate your old vdi file. If the vdi is added successfully, it will appear at the drop down menu as normal. Click continue and finish the wizard setup

6. Although each OS has the ability to detect a change in hardware, it is better for you to maintain the same harddisk setup (IDE/SATA) as per your old VM setting. Select your new VM, go to Setting -> Storage and set up as per your old VM Storage setting.

7. Also, remember to setup your Network if necessary.
8. Now, select your new VM and click start to run it. Depend on your hardware changes, your OS will detect and ask your for hardware information if needed
That all. Although it requires manual setup of the VM, this way will create the VM xml, UUID and detect hardware changes safely.

Comments
Post a Comment